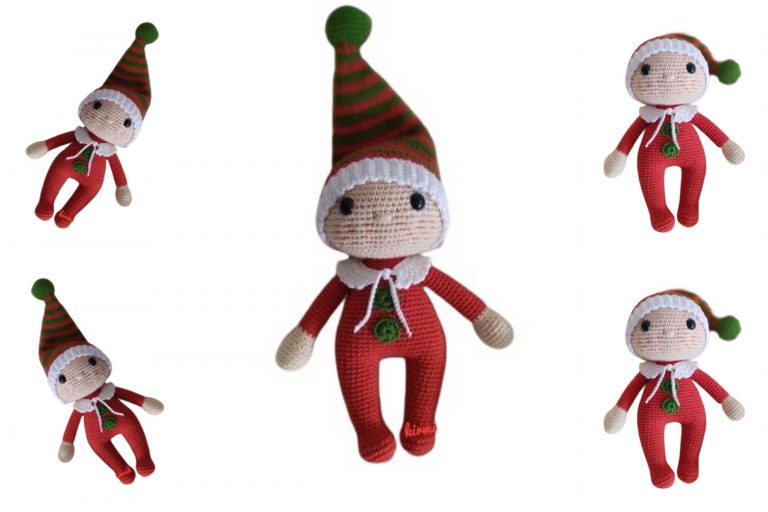
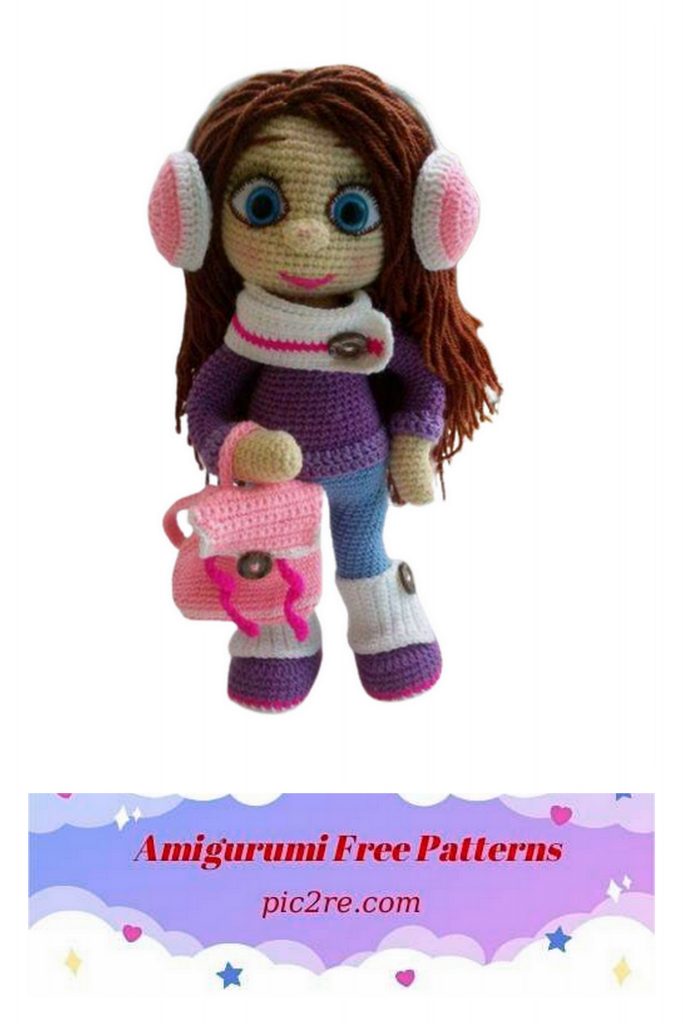
Amigurumi Cute Doll Free Pattern
Required materials and tools:
1) for the body yarn “Podmoskovnaya from Troitsk” (50% wool/50% acrylic, 250m/100g) color “champagne” – 1 piece;
2) for hair yarn “Podmoskovnaya from Troitsk” (50% wool/50% acrylic, 250m/100g) cognac color
3) for shoes and sweater yarn “Bambino” (merino wool 35%, acrylic 65%, 150m/50g) lilac (or any other colors to your taste) – 1 pc;
4) for panties yarn “Bambino” (merino wool 35%, acrylic 65%, 150m/50g) blue – 1 piece;
5) for leggings, soles, scarves, headphones, trim – yarn “Bambino” (merino wool 35%, acrylic 65%, 150m/50g) white color – 1 piece;
6) for and yarn “Bambino” (merino wool 35%, acrylic 65%, 150m/50g) pink – 1 pc;
7) some Bambino yarn (merino wool 35%, acrylic 65%, 150m/50g) raspberry color for finishing a scarf, shoes and, and for mouth embroidery;
8) buttons for decoration – 4 pcs;
9) aluminum wire for weaving with a cross section of 1.5-2 mm – 2.5 – 3 m (for the frame of the doll and headphones);
10) white wide adhesive plaster (or electrical tape) for winding the ends of the wire – a little;
11) eyes on a safe mount blue (or any other to your taste) with a diameter of 16 or 20 mm – 1 pair;
12) eyelashes for dolls 8 mm long;
13) thick cardboard or white plastic for soles;
14) a few threads “Mouline” or “Iris” brown and a suitable needle;
15) some white felt for the eyes;
16) super glue for attaching eyes and cilia;
17) filler (holofiber, or synthetic winterizer, or synthetic winterizer) – about 150 gr.;
18) white nylon thread or fishing line for tightening the face;
19) hook number 3;
20) scissors;
21) dry pastel or regular blush for tinting (optional).
From these materials, the pupa is obtained with a height of approximately 43 – 45 cm!
Knitting Tips!
✓ At the beginning of each row, be sure to use a marker, this will help to mark the first loop of each new row.
✓ Knit not loosely, but tightly enough so that when stuffing parts did not glow holes.
✓ Stuff the toy tightly so that it does not lose its shape, but try not to stretch the fabric.
Abbreviations
MR – amigurumi ring
CH – air loop
SC – single crochet
DC – double crochet
SL-ST – connecting post
BLO – rear half loop
FLO – front half loop
DEC – decrease
İNC – increase
HDC – double crochet
W – bump (or lush column) \u003d 4 HDC with one top
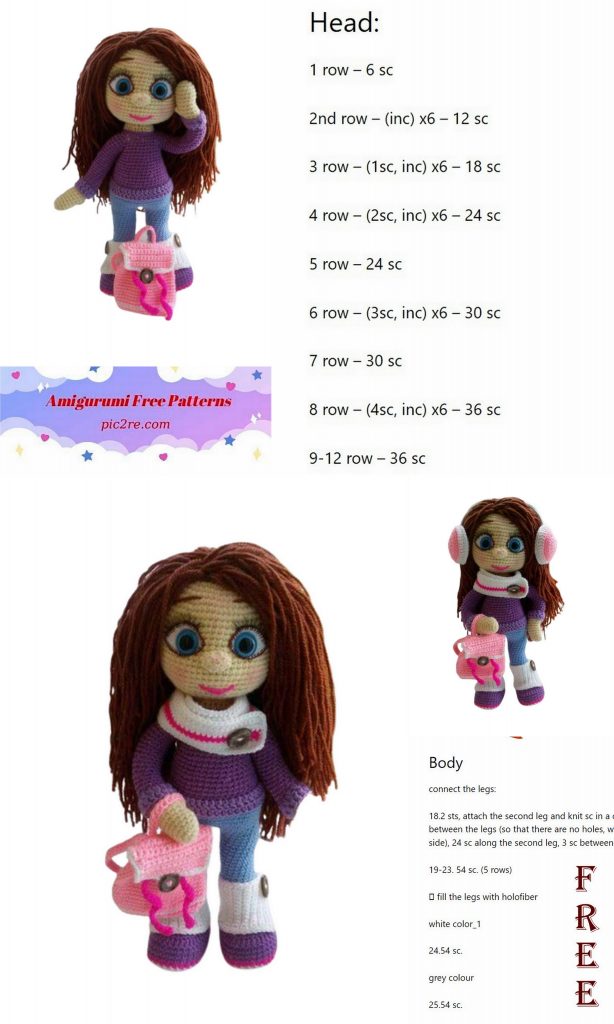
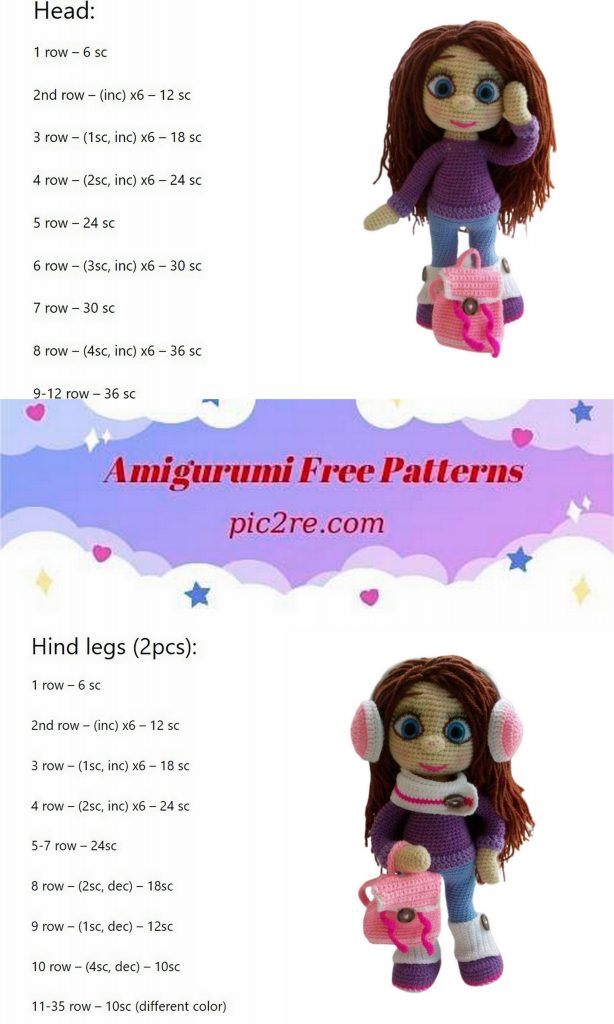
Stage 1. Head + nose.
Head. We knit in a circle.
1 row: 6 SC in MR (6)
2 row: 6 İNC (12)
3 row: (1 SC, İNC) * 6 (18)
4 row: 1 SC, İNC, (2 SC, İNC) * 5, 1 SC (24)
5 row: (3 SC, İNC) * 6 (30)
6 row: 2 SC, İNC, (4 SC, İNC) * 5, 2 SC (36)
7 row: (5 SC, PR) * 6 (42)
8 row: 3 SC, PR, (6 SC, İNC) * 5, 3 SC (48)
9 row: (7 SC, İNC) * 6 (54)
10 row: 4 SC, İNC, (8 SC, İNC) * 5, 4 SC (60)
11-23 rows (13 rows): 60 SC (60)
24 row: 4 SC, DEC, (8 SC, DEC) * 5, 4 SC (54)
25 row: (7 SC, DEC) * 6 (48)
26 row: 3 SC, DEC, (6 SC, DEC) * 5, 3 SC (42)
27 row: (5 SC, DEC) * 6 (36)
28 row: 2 SC, DEC, (4 SC, DEC) * 5, 2 SC (30)
29 row: (3 SC, DEC) * 6 (24)
30 row: 1 SC, DEC, (2 SC, DEC) * 5, 1 SC (18), SL-ST
We fix the thread, leave the end longer for sewing on the head.
We fill the head with filler.
We knit a nose.
1 row: cast on 4 CH, from the second loop from the hook: İNC, 1 SC, 4 SC in the last loop, on the other side of the chain: 1 SC, İNC (10)
2nd row: 10 SC (10)
We fasten the thread, cut it off, leaving the end for nose sewing.
Stage 2. Legs.
We knit the sole of the shoes in white.
1 row: 10 CH + 2 CH lifting
2nd row: 4 dc in 3rd st from hook, 8 dc, 5 dc in last st, 8 dc on other side of chain, SL-ST (25)
3rd row: 2 CH in, 1 DC in the same st as SL-ST, 4 inc DC, 8 inc, 5 inc
DC, 8 DC, SL-ST (35)
We cut out insoles from cardboard or plastic according to the resulting foot.
Change the thread to raspberry.
4 row: knit for BLO 35 SC (35)
Change the thread to purple.
5 – 8 rows (4 rows): 35 SC (35)
We knit 3 more SC, thus shifting the marker of the beginning of the row to the middle of the heel.
9 row: 10 SC, 7 DEC, 11 SC (28)
Insert the insole.
10 row: 9 SC, 5 DEC, 9 SC (23)
11 row: 23 SC (23)
We measure about 80 cm of wire. Fold in half, make
end of the loop in the shape of the foot, twist the ends. AT put in
shoes.
12 row: 9 SC, 3 DEC, 8 SC (20)
13 row: (DEC, 8 SC) * 2 (18)
We fill the shoe with filler.
Change the thread to blue.
14 row: knit for BLO 18 SC (18)
15 – 38 rows (24 rows): 18 SC (18)
Do not forget to fill the leg with filler in the course of knitting.
We knit 4 more SC to the middle of the inside of the leg, thread
fasten, cut. We knit the second leg in the same way, but the thread is not
cut off, then we will connect the legs in the body.
We knit leggings (2 pcs.).
With white yarn, dial a chain from
12 CH + 1 CH lifting.
Next, we knit SC with rotary rows.
1 row: 12 SC, CH, turn (12)
2nd row: 12 SC, CH, turn (12)
3 row: 12 SC, CH, turn (12) and so we knit 32 rows.
We tie the resulting fabric in a circle SC. We put on leg warmers,
sew on a button. Legs are ready!
Stage 3. Hands.
First, we knit the palm with flesh color.
1 row: 6 SC in MR (6)
2 row: 6 İNC (12)
3 row: (5 SC, İNC) * 2 (14)
4 – 8 rows (5 rows): 14 SC (14)
9 row: SC, W (4 HDC with one top), 12
SC (14) (see photo)
10 row: 14 SC (14)
11 row: (DEC, 5 SC) * 2 (12)
12 row: 12 SC (12)
Change the thread to purple.
13th row: 12 SC (12)
14 row: 12 SC for BLO (12)
We take a wire 25 – 30 cm long, bend it on one side and make
a small loop, twist the ends and isolate with adhesive tape or
tape. Insert the wire blank into the palm, fill
filler.
15 – 33 rows (19 rows): 12 SC (12)
We fill the handle with filler in the course of knitting. We fasten the thread, cut it. We knit the second handle in the same way.
Sleeve cuff.
We turn the handle away from us, attach the thread to the first left half-loop
14 rows where we knitted for BLO.
1 row: 2 CH rise, DC in the same half loop, (2 DC, İNC, DC) * 3, 2 DC, SL-ST (16)
2nd row: 2 CH lifts, 15 DC, SL-ST (16)
Stage 4. Body.
We connect the legs. On the leg, where the thread was left uncut, we collect
3 CH and connect the SB with the second leg. We put a marker and mark the beginning of the row.
Row 1: 42 SC (18 SC in right leg, 3 SC in CH chain, 18 SC in left leg, 3 SC in other side of CH chain) (42)
2 row: 42 SC (42)
We connect the wire from two
legs, twist, isolate.
3 row: (6 SC, İNC) * 6 (48)
4 – 6 rows (3 rows): 48 SC (48)
7 row: (7 SC, İNC) * 6 (54)
8-10 rows (3 rows): 54 SC (54)
11 row: (DEC, 7 SC) * 6 (48)
12 row: (DEC, 6 SC) * 6 (42)
We tie to the middle of the side and
move the row start marker to
the middle of the side.
Change the thread to purple.
13 row: 42 SC (42)
14 row: 42 SC for BLO (42)
15-17 rows (3 rows): 42 SC (42)
18 row: (DEC, 5 SC) * 6 (36)
19 – 23 rows (5 rows): 36 SC
24 row: (DEC, 4 SC) * 6 (30)
25 – 26 rows (2 rows): 30 SC (30)
We tie the hands, starting with the right hand.
27 row: 4 SC, grabbing the SC of the right arm and the SC of the body
simultaneously, 11 SC across the body, 4 SC, grabbing at the same time
SC left arm and torso, 11 SC torso (30)
28 row: 38 SC (8 SC on the right handle, 11 SC on the torso, 8 SC on
left handle, 11 SC on the body) (38)
We fasten the wire from the handles to the main coil coming from the legs,
isolate well.
29 row: DEC, 5 SC, DEC, 10 SC, DEC, 5 SC, DEC, 10 SC (34)
30 row: DEC, 3 SC, DEC, 10 SC, DEC, 3 SC, DEC, 10 SC (30)
Do not forget to fill the body with filler in the course of knitting.
31 row: (DEC, 3 SC) * 6 (24)
All ends of the wire sticking out of the body are bent in a loop, good
isolate.
We knit to the middle of the side, change the thread to a solid one.
32 row: 24 SC for BLO (24)
33 row: (DEC, 2 SC) * 6 (18)
34 – 35 rows (2 rows): 18 SC (18)
We fasten the thread, cut it, leaving the end longer for sewing
heads.
Elastic band at the bottom of the sweater.
We unfold the chrysalis in the direction of the legs away from us. We attach the thread of lilac color to the first left half-loop of the 14th row.
1 row: 2 CH rise, DC in the same loop, (6 DC, İNC, DC) * 5, 6 DC (48)
2 row: 48 DC (48)
We fix the thread, cut it off, hide the ends.
Stage 5. Making the face.
First, we make a tightening of the eye.
We count from the first row of knitting 16 rows of SC down and between the 16th and 17th rows we put a blue pin (see photo). We count from the blue pin up 2 SC and put the yellow pin. We count from the yellow pin CH right 8 SC, put the lilac pin.
We count down from the lilac pin down 2 SC and
The author’s work of Ekaterina Fomina put a green pin. Below, on the last row of knitting, exactly in the middle between the blue and green pins, becoming a red pin.
We take a large needle and a nylon thread (or fishing line), insert the needle into an open hole in the head, withdraw at the blue dot (see photo), insert again, but at the yellow dot, and withdraw at the red dot.
We pull the eye, tie the ends of the thread into several knots, hide
ends in the opening of the head. For the second eye, we perform the same procedure: we insert the needle into the open hole in the head. you, output at the green dot (see photo), enter again at the lilac dot, output at the red dot. We pull the eye, tie the ends of the thread into several knots, hide.
Make sure that the eyes are drawn in the same way!
Next, let’s move on to the eyes.
We cut out two identical blanks for the peephole from felt, make small cuts in the middle of the blanks, insert blue pupils.
We try on the resulting eyes on the chrysalis. We take a brown thread “Iris”
and sew the tried-on pieces of felt to the head. Then smear the blue pupils of the eyes on the reverse side with super glue and glue to the already sewn eye.
Cut off the eyelashes of the required length, glue with super glue to top edge of the eye. Thread prepared for hair, embroider eyebrows. Embroider the mouth with raspberry thread. Sew on the spout knitted earlier.
Ears.
We embroider a flesh-colored thread on the head
chain stitch the contour of the ears (see photo). We do not cut the thread, but for the resulting loops we knit SC.
We knit the second ear in the same way.
Stage 6. Hair.
The doll’s hair can be made any length you want. In my
case, the hair is 25 cm. To begin with, we cut the hair of the required length from the yarn prepared for them. We take any book 25 cm high (or the height of how long the hair will be). Winding the thread on the book (see photo). Cut the winding on one side. Strings are obtained 50 cm long.
Then we fasten the hair like a fringe: holding the hook in the direction from crowns, we introduce it under SC, we catch a thread folded in half, pull the loop, pull the ends of the thread into the loop and tighten (see photo).
Thus, we first fasten the hair along the intended growth line hair, which we define visually, then fill everything with hair space on the head inside these lines (see photo). We fasten in a row hair for each SC, but fasten through a row of SC.
Stage 7. Scarf, backpack and headphones.
Scarf.
With white yarn we collect a chain of 90 CH plus 1 CH lift. Further
We knit SC with turning rows.
1 row: 90 SC, CH, turn (90)
2nd row: 90 SC, CH, turn (90)
3 row: 90 SC, CH, turn (90)
Change the thread to raspberry.
4 row: 90 SC, CH, turn (90)
5th row: 6 SC, 5CH, skip 5 SC, 79 SC, CH, turn (90)
If the button on the scarf is small, then dial and skip at 5
a row needs less than 5 loops, we are guided by the size of the selected button.
Change the thread to white.
6 row: 90 SC, CH, turn (90)
7 row: 90 SC, CH, turn (90)
8 row: 90 SC on the long side of the scarf, 10 SC on the side of the scarf,
we fasten the thread and cut it.
We try on a scarf on a doll, sew on a button.
Backpack.
Knit with pink yarn. We collect a chain of 15 CH plus 1 CH
rise.
1 row: from the second from the hook of the loop 14 SC, 3 SC into the last loop,
other side of the chain: 14 SC, İNC (33)
2 row: İNC, 13 SC, 3 İNC, 14 SC, 2 İNC (39)
Change the thread to white.
3rd row: 39 SC for BLO (39)
Change the thread to pink.
4 – 16 rows (13 rows): 39 SC (39)
17 row: 20 sc, 19 sc for BLO, SL-ST (39)
18 row: 3 CH, (1 SC İNC, DC, CH) * 19, SL-ST (39)
19 row: CH, 39 SC, SL-ST (39)
We fasten the thread, cut it.
Backpack cover.
We attach a pink thread to the second half-loop of the 17th row.
1 row: 17 SC, CH, turn (17)
2nd row: 17 SC, CH, turn (17)
3 – 15 rows (13 rows): 17 SC, CH, turn (17)
On the last 15th row, CH and turn is not we do, and we fasten and cut the thread.
We tie the cap along the contour with a white thread: 14 SC on the right side
caps, 2 SC in corner, 6 SC in front, 5 CH, skip 4
SC, 6 SC, 2 SC in the corner, 14 SC on the left side of the cap (49)
We fasten the thread, cut it.
Backpack straps.
Left strap.
We attach the pink thread to the 3rd
half loop 3 rows, where previously knitted for BLO.
We cast on 25 CH, SL-ST behind the partition of the 3rd loop of the 17th row (the row in which
backpack cover was attached), SL-ST for
partition of the 4th loop of the 17th row, 25
DC, SL-ST for 4th half st of row 3. We fasten the thread, cut it.
Right strap.
We attach the pink thread to the 14th half-loop of the 3rd row.
Cast on 25 CH, SL-ST behind the partition of the 14th loop of the 17th row, SL-ST behind the partition
15th st of row 17, 25 DC, SL-ST in 15th half st of row 3. We fasten the thread, cut it.
Backpack handle.
We collect with a pink thread 16 CH, from the 2nd loop from the hook we knit 15 SC.
We fasten the thread, cut it.
Drawstring for a backpack.
We collect raspberry thread 81 CH, from the 2nd loop from the hook we knit 80 SC.
We fasten the thread, cut it.
We insert the lace into the backpack, tighten and tie. Sew on
the center of the backpack in front of a button in the place where the fastener will be.
We sew a handle on the cover of the backpack.
Backpack is ready!
Headphones.
We make a blank-frame of an earpiece from a wire. For this we cut
wire about 45 long
see, bend the end s in the form rings, isolate adhesive tape or
tape, add
wire shape earphone
(see photo).
We knit the inside of the earpiece with a pink thread (2 parts).
1 row: 6 SC in MR (6)
2 row: 6 İNC SC (12)
3 row: 2 CH lifts, DC in the same loop, DC, (İNC DC, DC) * 5, SL-ST (18)
4 row: 2 CH rise, DC in the same loop, 2 DC, (İNC DC, 2 DC) * 5, SL-ST (24)
5 row: 2 CH rise, DC in the same loop, 3 DC, (İNC DC, 3 DC) * 5, SL-ST (30)
We fasten the thread, cut it.
Then we also knit the outer part of the earpiece (cup) with a pink thread.
1 row: 6 SC in MR (6)
2 row: 6 İNC SC (12)
3 row: 2 CH lifts, DC in the same loop, DC, (İNC DC, DC) * 5, SL-ST (18)
4 row: 2 CH rise, DC in the same loop, 2 DC, (İNC DC, 2 DC) * 5, SL-ST (24)
5 row: 2 CH rise, DC in the same loop, 3 DC, (İNC DC, 3 DC) * 5, SL-ST (30)
Change the thread to white.
6 row: 2 CH lifts, 29 DC, SL-ST (30)
We do not cut the white thread, but continue to connect the inner and outer part SC: 20 SC, lightly fill cup with filler earpiece, insert a wire blank, 10 SC.
We fasten the thread and cut it.
We knit the second cup in the same way, but after we connected the SC two parts of the earpiece (inner and outer) and fixed the cup on the wire frame, we do not cut the white thread, but continue to tie the rim of the headphones from the SC wire. We knit so much SC so that the wire on the rim does not shine through, I got 50 SC.
We fix the thread, cut it off, hide the ends.