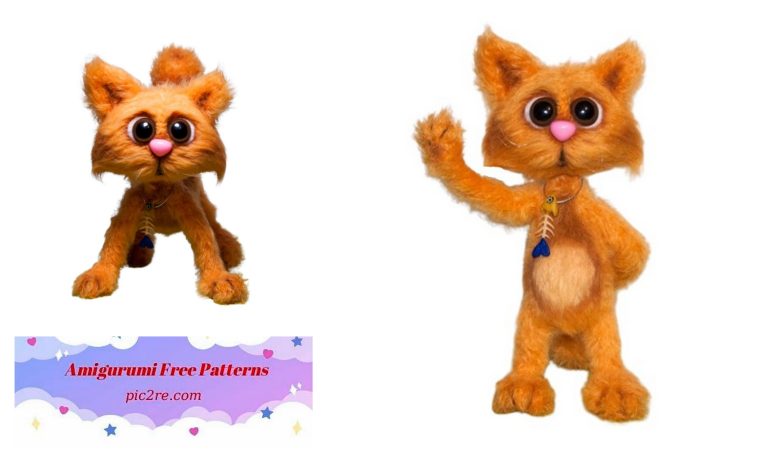
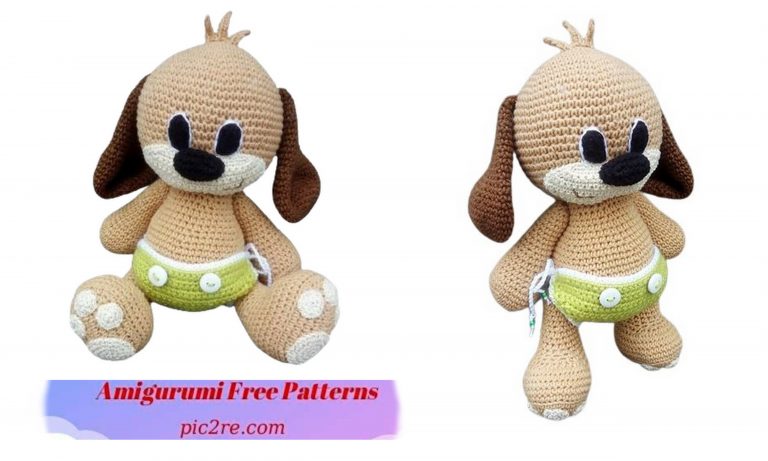
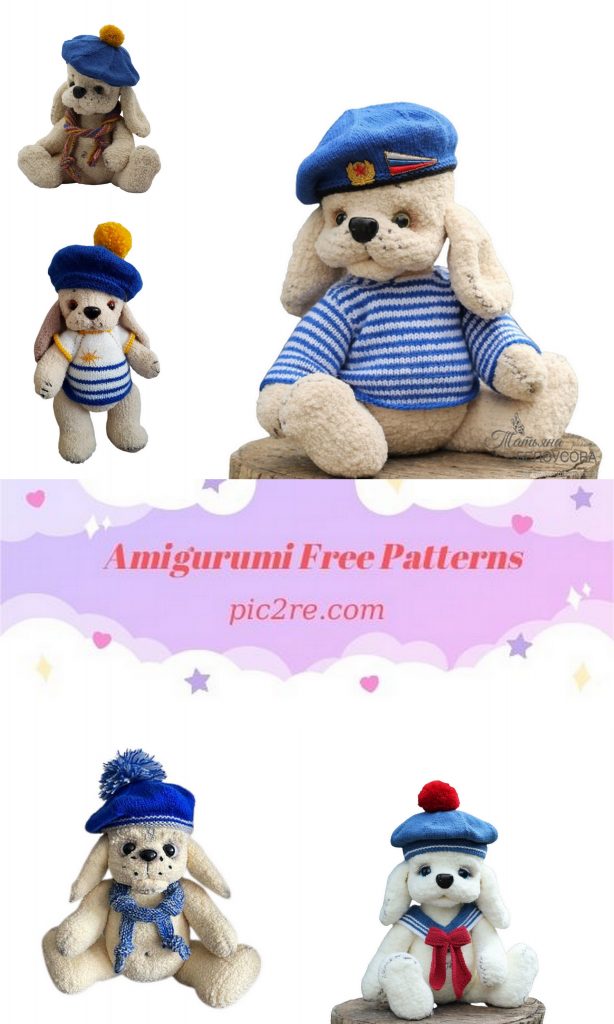
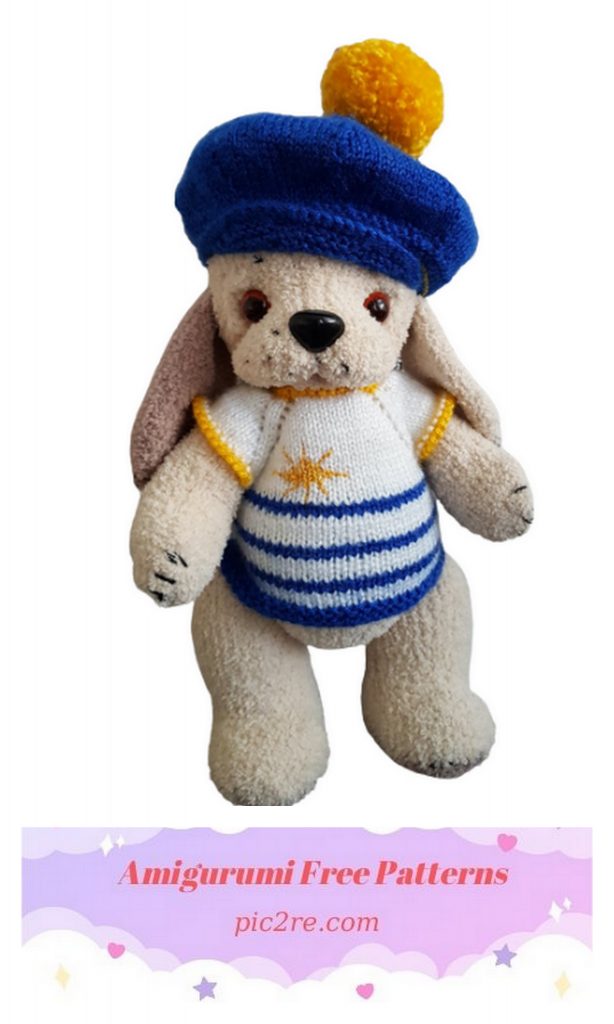
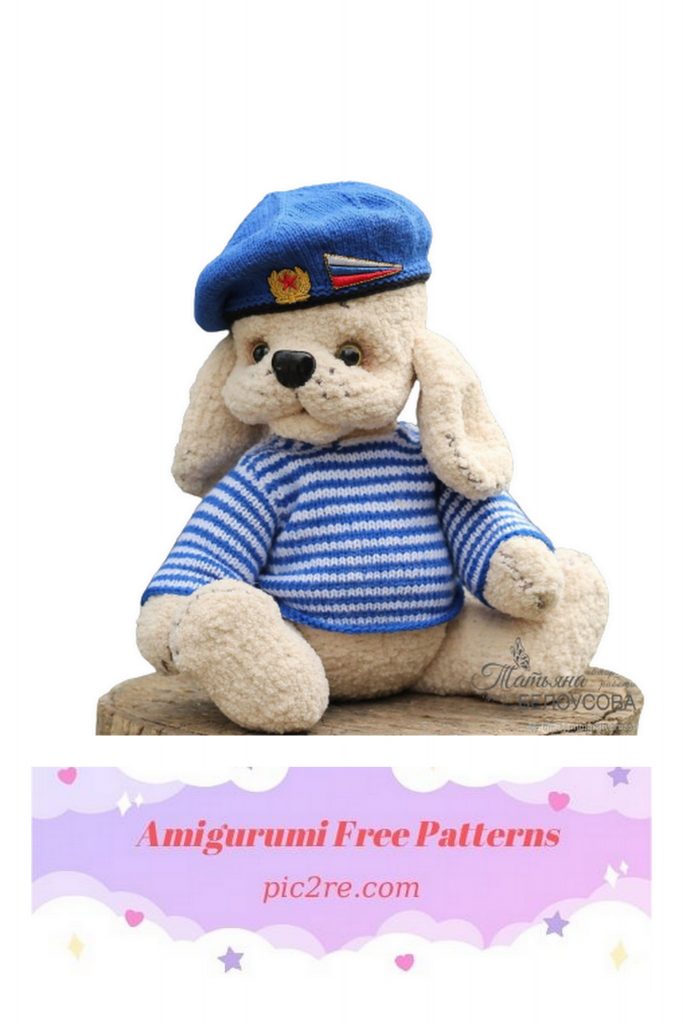
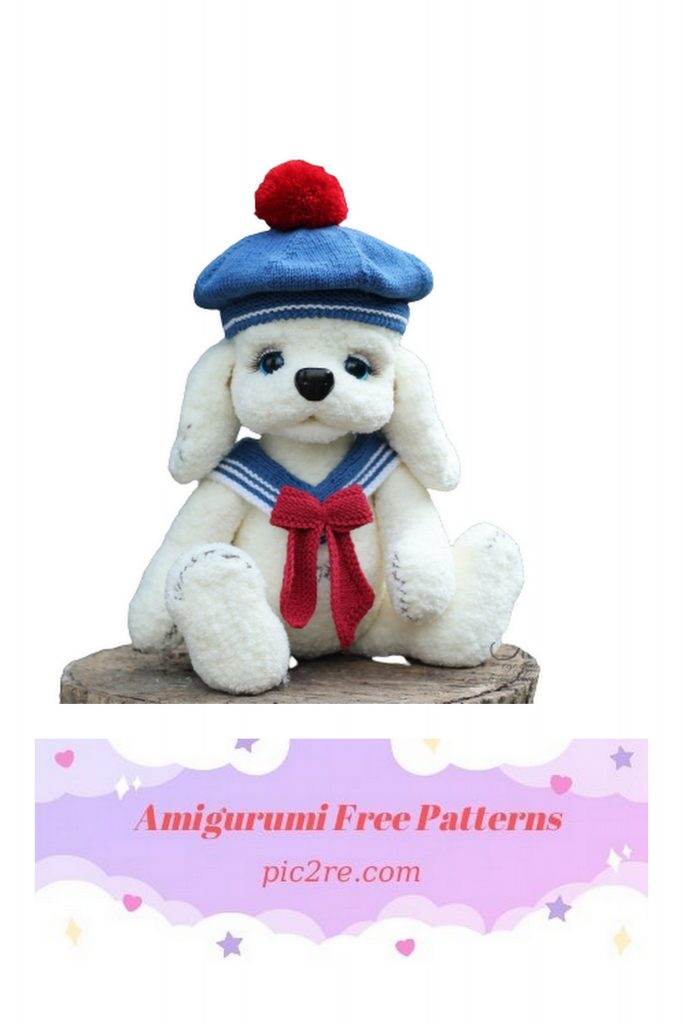
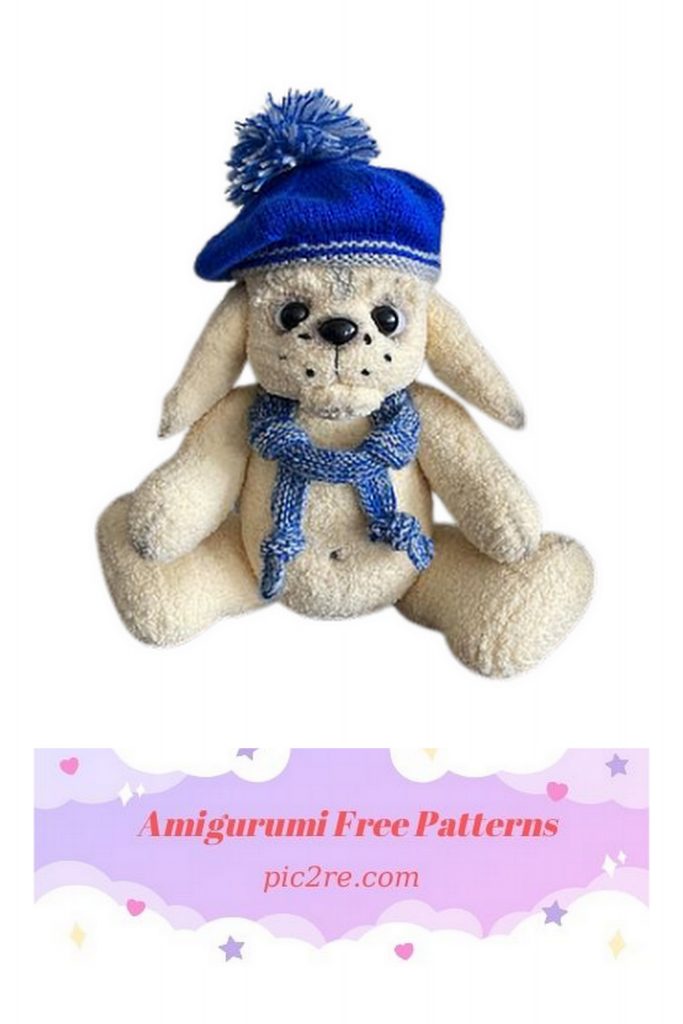
Amigurumi Cute Plush Dog Free Pattern
The height of the toy when using the recommended materials and tools is 32 cm, sitting 25 cm. Amigurumi Cute Plush Dog Free
Abbreviations:
– purl – front
– knit – purl
– cr – edging – knit as usual the first loop to remove, the last to knit purl
– hosiery – if we knit on 2 needles – 1 row of front loops, one row of purl
loops. If we knit in a circle – only the front loops.
– garter stitch – all knit stitches, if we knit in a circle then, 1 row knit stitches, 1 row purl loops.
– inc knit from 1 st 2 – (knit from 1 st 2 front, for the front and back walls)
– dec – decrease purl – knit 2 together, dec knit – purl 2 together
– decL – knit 2 together with the front one with a tilt to the left
– decR – knit 2 together with the front one with a slope to the right
– (…) * 2p – brackets indicate repetition of actions. Repeat loops in brackets 2 times.
After the = sign is the total number of loops!
Tools.
Stocking knitting needles No. 2 or 2.5 – 5 pieces, for clothing stocking No. 2.
Hook No. 1.5 or 2.
Markers. You can use regular pins, or colored yarn.
Thick sewing needle, ordinary sewing needle.
Scissors.
Glue “Moment crystal”.
Small pliers, or split pin driver.
Hot melt glue.
Tint brush.
Materials.
For the body Softy Plus – 100% micropolyester, 100 g. 120 m – color No. 199 or 310, a little more
150 gr. Fine contrasting yarn for embroidery.
For clothes, YarnArt “JEANS” yarn, blue (No. 17), old gold – No. 84. For a scarf
Angora Naturel Prints No. 1827
Holofiber filler – synthetic balls.
Plastic eyes with a diameter of 15 – 16 mm.
Nose 24 * 19 mm.
Cotter pins 2.5 * 25 mm – 5 pcs, washers 4 * 12 mm – 10 pcs, discs 30 mm 4 pcs – handles, 50 mm – 4 pcs
legs, 45 mm – 2 pcs – head.
Optional pastel for toning.

The torso.
To form a hole through which we will attach the legs, head and
fill with fluff first we knit on 2 knitting needles, then on 4 knitting needles in a circle.
We put all markers on the seamy side, it will serve as the front side.
The basis is hosiery.
We start with the ass.
Dial 8 pet. We knit on 2 needles.
1 row: – (inc) * 8 times = 16 – increments together with the edge
2nd row: – cr, 14 knit, cr = 16
3rd row: – (1 purl, inc) * 8 times = 24 – together with edging
4th row: – cr, 22 knit, cr = 24
5 row: – cr, (inc, 3 purl) * 5 times, inc, 1 purl, cr = 30
6 row: – cr, 28 knit, cr = 30
7 row: – cr, 1 purl, (inc, 4 purl) * 5 times, inc, 1 purl, cr = 36
8 row: – cr, 34 knit, cr = 36
9th row: – cr, 2 purl, (inc, 5 purl) * 5 times, inc, 1 purl, cr = 42
10 row: – cr, 40 knit, cr = 42
11 row: – cr. 8 purl, inc, (3purl, inc) * 2 times, 2 purl, (inc) * 2 times, 2 purl, (inc, 3 purl) * 2 times, inc, 8 purl, cr = 50
12, 14 row: – cr, 48 knit, cr = 50
13th row: – cr, 48 purl, cr = 50
15 row: – cr, 11 purl, marker – here we will attach the legs, 26 purl, marker, 11 purl, cr = 50
16 row: – cr, 48 knit, cr = 50
17th row: – cr, 48 purl, cr = 50
Distribute loops on 4 needles (13,12,12,13). Then we knit in a circle:
18 row: – (1 purl, dec) * 2 times, 15 purl, (inc, 1 purl) * 2 times, (1 purl, inc) * 2 times, 15 purl, (dec, 1 purl) * 2 times = 50
19 – 38 row: – 20 rows of purl p
39 row: – (5 purl, dec) * 3 times, 1 purl, dec, 2 purl, dec, 1 purl, (dec, 5 purl) * 3 times = 42
40 – 42 row: – 3 rows of purl p
43 row: – (5 purl, dec) * 6 times = 36
44 – 46 row: – 3 rows purl p
47 row: – (dec, 4 purl) * 6 times = 30
48 row: – purl p
49 row: – 7 purl, marker (here we will attach the pens), 16 purl, marker, 7 purl = 30
50.51 row: – 2 rows purl p
52 row: – (dec, 8 purl) * 3 times = 27
Row 53 – 55: – 3 rows of purl p
56 row: knit rotary rows to form the neck. Here we go
through the beginning of the row. After we connect, you need to return to the place
– 9 purl, turn, 1 pet to remove, 17 knit, turn,
1 st to remove, 15 purl, turn, 1 st to remove, 13 knit, turn,
1 st to remove, 11 purl, turn, 1 st to remove, 9 knit, turn,
1 pet remove purl before the beginning of the row
57 row: – purl p
58 row: – (7 purl, dec) * 3 times = 24
Row 59: – purl p
60 row: – (2 purl, dec) * 6 times, = 18
Row 61: – purl p
62 row: – (dec, 1 purl) * 6 times = 12
Row 63: – purl p
64 row: – (dec) * 6 times.
Cut the thread, pull through all loops, pull off, fasten. Mark the center where we tightened the loops, here then we will remove the cotter pin and attach the head. Turn the part to the wrong side.
Legs.
We knit on 4 knitting needles in a circle. The basis is hosiery.
We put all markers on the seamy side, it will serve as the front side.
Both fit the same. We start with the sole.
The beginning of the row runs along the back of the leg, in the middle.
Cast on 25 stitches for overlays with contrasting yarn. We knit on
4 knitting needles in a circle.
1st row: – inc, 9 purl, inc, 3 purl. inc, 9 purl, inc = 29
2nd row: – purl
3rd row: – inc, 10 purl, inc, 5 purl. inc, 10 purl, inc = 33
4th row: – purl
5 row: – 1 purl, inc, 10 purl, inc, 7 purl. inc, 10 purl, inc, 1 purl = 37
6 row: – Next we knit with the main color. The contrasting thread can be cut off. If you knit an overlay, then – 1 row of knit loops, if we knit without an overlay, then purl loops.
7th row: – 1 purl, inc, 11 purl, inc, 2 purl, inc, 3 purl, inc, 2 purl, inc, 11 purl, inc, 1 purl = 43
Sole – turn the work, knit with purl loops on the wrong side.
8 row: – purl
9th row: – 2 purl, inc, 15 purl, (inc, 2 purl) * 2 times, inc, 15 purl, inc, 2 purl = 48
10-15 row: – 6 rows purl p
16 row: – 12 purl, (dec) * 12 times, 12 purl = 36
17.18 row: – 2 rows purl p
19 row: – dec, 10 purl, (dec) * 6 times, 10 purl, dec = 28
20 row: – 12 purl, close 4 loops (a hole is formed, which is then sewn during assembly – see
photo), 12 purl = 24
We distribute the loops on 3 or 4 knitting needles.
We continue knitting:
We turn the work, in the same way as the sole, we knit with purl loops on the seamy side.
Rows 21 – 23: – 3 rows purl p
24 row: – 11 purl, (inc) * 2 times, 11 purl = 26
25 – 27 row: – 3 rows of purl p
28 row: – inc, 11 purl, (inc) * 2 times, 11 purl, inc = 30
29 – 42 row: – 14 rows purl p
43 row: – 6 purl, (marker – here we will display the cotter pin), 24 purl = 30
for the second leg we knit mirrored – 24 purl, marker, 6 purl = 30
44 row: – (3 purl, dec) * 6 times = 24
45 – 47 row: – 3 rows of purl p
48 row: – (dec, 2 purl) * 6 times = 18
49.50 row: – 2 rows purl p
51 row: – (1 purl, dec) * 6 times = 12
52 row: – purl p
53 row: – (dec) * 6 times
Cut the thread, pull it through all loops. Secure. Turn the work out.
No. 2 – put a washer on the cotter pin, then insert the disc into the tab.
The stuffing is not very tight, especially in the sole area (see photo).
Sew up the holes, the seam line is drawn with a black line, fasten all the threads and hide them in the product. Embroider imitation claws.
No. 3,4 – view of the finished legs.
Left foot.
We knit on 3 or 4 knitting needles in a circle. The basis is hosiery.
We put all markers on the seamy side, it will serve as the front side.
We start with the palm.
The beginning of the row runs in the middle of the palm.
Cast on 8 stitches, distribute on 4 knitting needles, knit in a circle.
1 row: – 1 purl, (inc) * 2 times, 2 purl, (inc) * 2 times, 1 purl = 12
2nd row: – purl p
3rd row: – 2 purl, (inc) * 2 times, 4 purl, (inc) * 2 times, 2 purl = 16
4th row: – purl p
5 row: – 3 purl, (inc) * 2 times, 6 purl, (inc) * 2 times, 3 purl = 20
6 row: – purl p
7 row: – 4 purl, (inc) * 2 times, 8 purl, (inc) * 2 times, 4 purl = 24
8 row: – 6 purl, inc, 10 purl, inc, 6 purl = 26
9-14 row: – 6 rows purl p
Row 15: – 6 purl, dec, 2 purl, dec, 8 purl, (inc, 2 purl) * 2 times = 26
16 – 18 row: – 3 rows of purl p
19 row: – like the 15th
20 – 23 row: – 4 rows of purl p
24 row: – 7 purl, inc, 9 purl, dec, 2 purl, dec, 3 purl = 25
25 – 28 row: – 4 rows of purl p
29 row: – 7 purl, inc, 9 purl, (dec, 2 purl) * 2 times = 24
30 – 34 row: – 5 rows of purl p
35 row: – 7 purl, inc, 8 purl, (dec, 2 purl) * 2 times = 23
36 – 41 rows: – 6 rows of purl p
42 row: – (5 purl, dec) * 3 times, 2 purl = 20
43 – 45 row: – 3 rows of purl p
46 row: – 1 purl, marker (here we will display the cotter pin), 19 purl = 20
47 row: – purl p
48 row: – (dec, 1 purl) * 6 times, dec = 13
49 row: – purl p
Photo № 1 – 2 – fasten the thread in the typesetting row. Without removing the knitting needles, turn the part to the wrong side, fill in a little, literally a few balls. The foot should be flat, not round.
Put the washer on the cotter pin, then the disc and insert in the marker area.
50 row: – (dec) * 6 times, 1 purl = 7
Cut the thread, stretch it through all the loops, pull off, fasten and hide in the product.
To embroider imitation of claws with thin yarn.
Right foot.
We knit on 4 knitting needles in a circle. The basis is hosiery.
We put all markers on the seamy side, it will serve as the front side.
We start with the palm.
The beginning of the row runs in the middle of the palm.
Cast on 8 stitches, distribute on 4 knitting needles, knit in a circle.
1 row: – 1 purl, (inc) * 2 times, 2 purl, (inc) * 2 times, 1 purl = 12
2nd row: – purl p
3rd row: – 2 purl, (inc) * 2 times, 4 purl, (inc) * 2 times, 2 purl = 16
4th row: – purl p
5 row: – 3 purl, (inc) * 2 times, 6 purl, (inc) * 2 times, 3 purl = 20
6 row: – purl p
7 row: – 4 purl, (inc) * 2 times, 8 purl, (inc) * 2 times, 4 purl = 24
8 row: – 6 purl, inc, 10 purl, inc, 6 purl = 26
9-14 row: – 6 rows purl p
15 row: – (2 purl, inc) * 2 times, 8 purl, dec, 2 purl, dec, 6 purl = 26
16 – 18 row: – 3 rows of purl p
19 row: – like the 15th
20 – 23 row: – 4 rows of purl p
24 row: – 3 purl, dec, 2 purl, dec, 9 purl, inc, 7 purl = 25
25 – 28 row: – 4 rows of purl p
29 row: – (2 purl, dec) * 2 times, 9 purl, inc, 7 purl = 24
30 – 34 row: – 5 rows of purl p
35 row: – (2 purl, dec) * 2 times, 8 purl, inc, 7 purl = 23
36 – 41 rows: – 6 rows of purl p
42 row: – 2 purl, (dec, 5 purl) * 3 times = 20
43 – 45 row: – 3 rows of purl p
46 row: – 19 purl, marker (here we will display the cotter pin), 1 purl
47 row: – purl p
48 row: – (dec, 1 purl) * 6 times, dec = 13
49 row: – purl p
Design as left foot.
50 row: – (dec) * 6 times, 1 purl = 7
Ears.
Both ears fit the same. We knit on 3 or 4 knitting needles in a circle.
The basis is hosiery. The beginning of the row runs along the edge of the ear.
After we tie the part, you do not need to turn it out, we leave it on the front side.
Cast on 20 loops …
1 – 3 row: – 3 rows purl p
4th row: – 7 purl, inc, 9 purl, inc, 2 purl = 22
5,6 row: – 2 rows purl p
7 row: – 2 purl, inc, 10 purl, inc, 8 purl = 24
8.9 row: – 2 rows of purl p
10 row: – 9 purl, inc, 11 purl, inc, 2 purl = 26
11,12 row: – 2 rows of purl p
13th row: – 2 purl, inc, 12 purl, inc, 10 purl = 28
14 – 29 row: – 16 rows purl p
30 row: – (dec, 12 purl) * 2 times = 26
31 row: – (11 purl, dec) * 2 times = 24
32 row: – (dec, 10 purl) * 2 times = 22
33 row: – (9 purl, dec) * 2 times = 20
34 row: – (dec, 8 purl) * 2 times = 18
35 row: – (7 purl, dec) * 2 times = 16
36 row: – (dec, 6 purl) * 2 times = 14
Cut the thread, pull it through all the loops (or close the loops).
No need to tighten. Sew up the hole at the top and bottom, fasten the threads.
Decorate the edges with embroidery.
Steam lightly with an iron.
Lip.
We knit on 3 or 4 knitting needles in a circle.
The basis is hosiery.
After we tie the part, you do not need to turn it out, we leave it on the front side.
Cast on 18 loops.
1-7 row: – purl p
8 row: – (dec, 7 purl) * 2 times = 16
9 row: – purl p
10 row: – dec, 4 purl, (dec) * 2 times, 4 purl, dec =
Cut the thread, pull it through all the loops (or close the loops).
No need to tighten. Sew up the hole at the top and bottom, fasten the threads.
Steam lightly with an iron.
Tail.
The basis is hosiery. You can knit on 2 knitting needles, and then sew along the edge loops, you can on 3 in a circle.
After we tie the part, you do not need to turn it out, we leave it on the front side.
Cast on 9 loops.
– 9 rows of hosiery.
Cut the thread, pull through all loops, fasten.
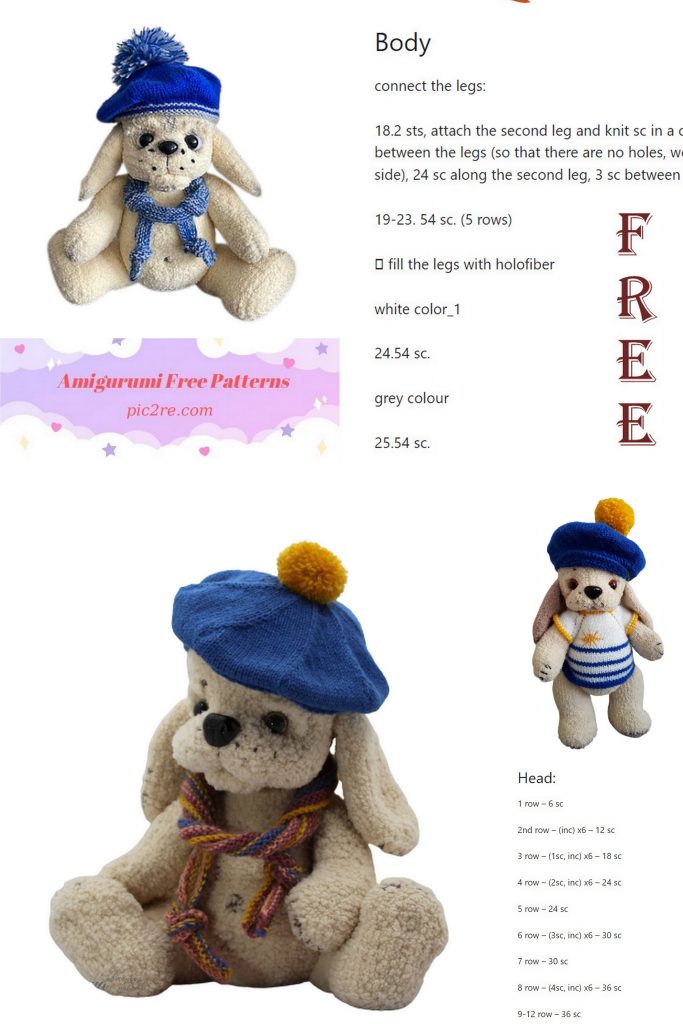
Head.
We start from the bottom of the head. We knit in a circle.
We put all markers on the seamy side, it will serve as the front side.
The basis is hosiery.
The beginning of the row runs along the back of the head, in the middle.
Cast on 7 loops, distribute over 4 knitting needles.
1 row: – (inc) * 7 times = 14
2nd row: – purl p
3rd row: – (inc, 1 purl) * 7 times = 21
4th row: – marker (here we will attach the head), 21 purl
5 row: – 1 purl, (inc, 2 purl) * 6 times, inc, 1 purl = 28
6 row: – purl p
7 row: – 1 purl, (inc, 3 purl) * 6 times, inc, 2 purl = 35
8 row: – 17 purl, inc, 17 purl = 36
9th row: – 9 purl, (inc, 1 purl) * 4 times, (inc) * 2 times, (1 purl, inc) * 4 times, 9 purl = 46
Rotary rows:
10 row: – 14 purl, inc, 16 purl, inc, turn, 1 pet off, 19 knit, turn,
– 1 pet off, inc, 16 purl, inc, 3 purl, turn, 1 pet off, 25 knit, turn,
– 1 pet off, 3 purl, inc, 16 purl, inc, 5 purl, turn, 1 pet off, 29 knit, turn,
Remove 1 st, purl to end of row (40 sts).
On the needles 52 loops.
11 row: – purl p
Rotary rows:
12th row: 37 purl, turn, remove 1 pet, 21 knit, turn,
– 1 pet to remove, 23 purl. turn, 1 pet to remove, 25 knit, turn,
– 1 pet to remove, 27 purl. turn, 1 pet remove, 29 knit, turn
– Remove purl 1 st to the end of the row (40 sts).
13,14 row: – 2 rows of purl
15 row: – 8 purl, inc, 3 purl, inc, 9 purl, dec, 4 purl, dec, 9 purl, inc, 3 purl, inc, 8 purl = 54
16 row: – 27 purl, marker (center of muzzle), 27 purl
17th row: – 7 purl, inc, 16 purl, dec, 2 purl, dec, 16 purl, inc, 7 purl = 54
18 row: – purl p
19 row: – 11 purl, inc, 12 purl, dec, 2 purl, dec, 12 purl, inc, 11 purl = 54
20 row: – 14 purl, marker (we will attach the ear), 26 purl, marker (ear), 14 purl = 54
21 row: – 21 purl, dec, 8 purl, dec, 21 purl = 52
22-24 row: – 3 rows of purl p
25 row: – 5 purl, dec, 14 purl, inc, 3 purl, inc, 4 purl, inc, 14 purl, dec, 5 purl = 53
26 – 28 row: – 3 rows of purl p
29th row: – 3 purl, dec, 17 purl, inc, 7 purl, inc, 17 purl, dec, 3 purl = 53
30 – 32 row: – 3 rows of purl p
33 row: – as the 29th row
34 – 36 row: – 3 rows of purl p
37 row: – (2 purl, dec) * 2 times, 17 purl, dec, 18 purl, (dec, 2 purl) * 2 times = 48
38,39 row: – 2 rows purl p
40 row: – (6 purl, dec) * 6 times = 42
41,42 row: – 2 rows purl p
43 row: – (dec, 5 purl) * 6 times = 36
44.45 row: – 2 rows purl p
46 row: – (4 purl, dec) * 6 times = 30
47.48 row: – 2 rows purl p
49 row: – (dec, 3 purl) * 6 times = 24
50 row: – purl p
51 row: – (2 purl, dec) * 6 times = 18
52 row: – purl p
Cut the thread, pull it through all the loops, you do not need to tighten! We will stuff our head through this hole. Fasten the thread in the dialing row.
Turn the part to the wrong side.
Assembly and design of the head.
No. 1,2 – remove the cotter pin with the disc and washer in the place marked with a marker, fill it tightly enough. Emphasize the forehead and cheeks; there should be a dimple in the eye area. Side view of photo # 2.
Note!
The thickness of the Softy Plus yarn is different, and a lot depends on the density of the knitting and packing, and the holofiber itself.
Head circumference slightly higher
eyebrows in my dogs about
33.5 – 35 cm.
If your toy has a larger head, then you need to increase the distance between the eyes and from the marker to the beginning of the nose straps. For a smaller circle, shrink.
No. 3 – We retreat from the marker along the row line to the left by about 2.5 cm –
point number 1 and about 2.5 cm more – point number 2. We do the same in the other direction – point number 3,4.
We step back from the marker down by about 3.5 cm and mark with markers the middle of the muzzle to the disk.
No. 4 – insert the needle in the middle of the muzzle and withdraw at point No. 1.
Leave the tip for bartacking (fixing the tie ).
# 5 – make a stitch just over a cm and return just above or below the insertion point.
№ 6.7 – we do the same, but only from the other side. Now pull both strings and tie.
Since the distance between points 1 and 2 is large (about 2.5 cm), if you pull it once, then this very gap will be strongly tightened.
Therefore, we drag in several stages, taking a step of no more than 1 cm!
Repeat the same thing, but withdraw the needle at point 2, and withdraw it anywhere in the middle of the muzzle.
So pull it several times so that the muzzle is divided into 2 halves and a wide eyeliner appears – about 2 cm.
№ 8 – 11 – view of the finished muzzle straight.
No. 12, 13 – attach the lower lip with needles. The widest edge of the lip starts from the disc.
№ 14 – 17 – sew, you can try on the eyes and nose. In the photo, the eyes are 18 mm, but then I replaced them with a smaller diameter.
№ 18 – 23 – you can additionally tighten the eye fossa. Insert the needle in the back of the head, pull out in the area of the eye pins, take a step of about 1 cm and come back. Do the same, but on the other hand.
Fasten and hide all strings in the product.
We do not glue the eyes and nose yet. Fix them after the whole toy has been framed.
No. 24, 25 – we tighten our mouth. Insert the needle in the middle of the lower lip and pull it out next to the eye, make a stitch about 1 cm closer to the ear and come back (see photo).
We do the same from the opposite side.
Fasten all the threads, you can use 1 knot.
You can fix and hide well after the toy is completely decorated. After assembly, it’s easier to redo if you don’t like something.
Hold your head in your hands as in the photo, press down with your thumbs in the area of the lower lip, and pull your cheeks down well.
№ 29 – using the photo to pin the ear with needles, then sew.
№ 30, 31 – insert the needle under the ear, at the edge, pass through the entire head, make a stitch of about 1 cm, and come back. Repeat several times.
No. 32 – squirrels can be cut out of felt.
№ 33 – we make eyebrows – crochet a chain of 10 air loops, sew on. To make the eyebrows wider, you can knit 1 row of sbn, and then sew on (photo No. 37). Or sew with a needle over the eyebrows with stitches with basic yarn (photo no. 36).
No. 34 – you can apply a tone, embroider a groove in the middle, points near the nose and eyebrows.
Attach the head, arms and legs.
• Fill the little body, sew up the hole on the butt.
• Sew on the tail.
• Embroider the navel.
• The puppy is ready!
Scarf.
Cast on 220 stitches.
1,3 row – cr, 118 purl, cr = 220
2nd row: – cr, 118 knit, cr = 220
Repeat these 3 rows 5 times.
16 row: – cr, 118 purl, cr = 220
17 row: – cr, 118 knit, cr = 220
Close the loops, fasten the threads.
Tie knots at the ends.
He takes it.
Knit on 4 needles # 2, tight enough, but not tight.
The basis is garter and hosiery.
Knit all crochets with the front crossed so that there are no holes.
Cast on 72 loops with blue yarn, distribute on 4 knitting needles, 18 loops each.
1 row: – mustard yarn – purl p
The mustard thread can be cut off, then we knit only with blue yarn.
2.4,6,8 row: – knit
3,5,7 row: – purl
9 row: – (yarn, 3 purl) * 24 times = 96
10 row: – purl p
11th row: – (12 purl, yarn) * 8 times = 104
12 row: – purl
13 row: – (13 purl, yarn) * 8 times = 112
14 row: – purl
15 row: – (14 purl, yarn) * 8 times = 120
16 row: – purl
17 row: – (15 purl, yarn) * 8 times = 128
Row 18: – purl
19 row: – (16 purl, yarn) * 8 times = 136
20 row: – purl
21 row: – (17 purl, yarn) * 8 times = 144
Rows 22 – 24: – 3 rows of purl
Next, we knit the bottom.
25 row: – (16 purl, decR) * 8 times = 136
26 row: – purl
27 row: – (15 purl, decR) * 8 times = 128
28 row: – purl
29 row: – (14 purl, decR) * 8 times = 120
30 row: – purl
31 row: – (13 purl, decR) * 8 times = 112
32 row: – purl
33 row: – (12 purl, decR) * 8 times = 104
34 row: – purl
35 row: – (11 purl, decR) * 8 times = 96
Row 36: – purl
37 row: – (10 purl, decR) * 8 times = 88
Row 38: – purl
Row 39: – (9 purl, decR) * 8 times = 80
40 row: – purl
41 row: – (8 purl, decR) * 8 times = 72
42 row: – purl
43 row: – (7 purl, decR) * 8 times = 64
Row 44: – purl
45 row: – (6 purl, decR) * 8 times = 56
46 row: – purl
47 row: – (5 purl, decR) * 8 times = 48
48 row: – purl
49 row: – (4 purl, decR) * 8 times = 40
50 row: – purl
51 row: – (3 purl, decR) * 8 times = 32
52 row: – purl
53 row: – (2 purl, decR) * 8 times = 24
54 row: – purl
55 row: – (1 purl, decR) * 8 times = 16
Row 56: – purl
57 row: – (decR) * 8 times = 8
Cut the thread, pull through all the loops.
Count from the beginning of the row on both sides for 20 loops.
On the typesetting edge, cast on the middle 32 loops.
We turn the work as in the photo. We knit with a blue thread on 2 needles.
1st row: – cr, 30 purl, cr = 32
2nd row: – cr, dec, 6 purl, inc, 12 purl, inc, 6 purl, dec, cr = 32
3rd row: – cr, 30 purl, cr = 32
4th row: – cr, dec, 26 purl, dec, cr = 30
5 row: – cr, dec, 6 purl, inc, 10 purl, inc, 6 purl, dec, cr = 30
6 row: – cr, dec, 24 purl, dec, cr = 28
7 row: – cr, dec, 6 purl, inc, 8 purl, inc, 6 purl, dec, cr = 28
8 row: – cr, dec, 22 purl, dec, cr = 26
9th row: – cr, dec, 5 purl, inc, 8 purl, inc, 5 purl, dec, cr = 26
10 row: – cr, dec, 20 purl, dec, cr = 24
11th row: – cr, dec, 5 purl, inc, 6 purl, inc, 5 purl, dec, cr = 24
Close the loops, crochet sbn. Cut the thread … Secure. Amigurumi Cute Plush Dog Free