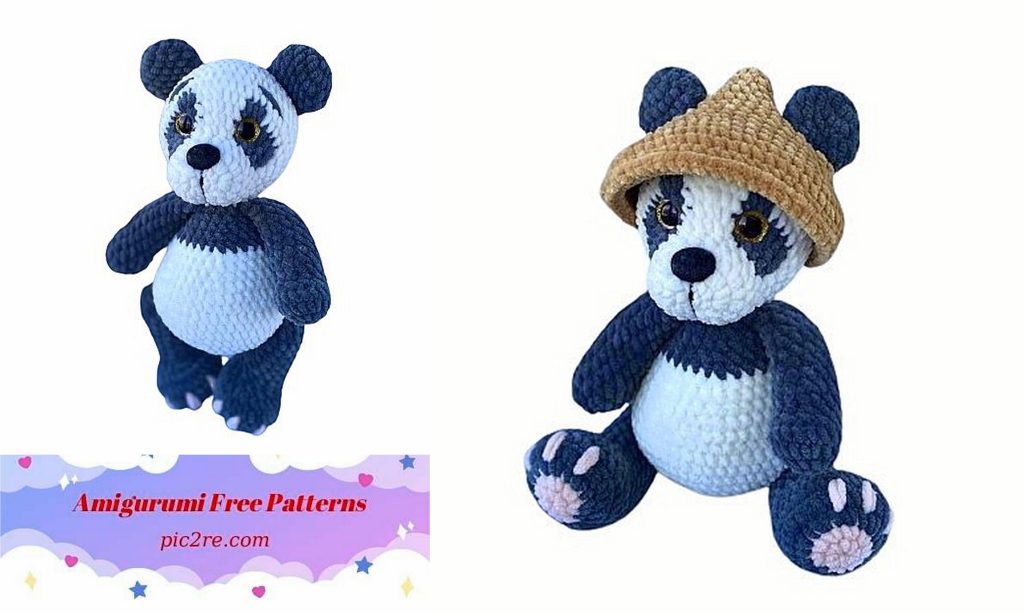
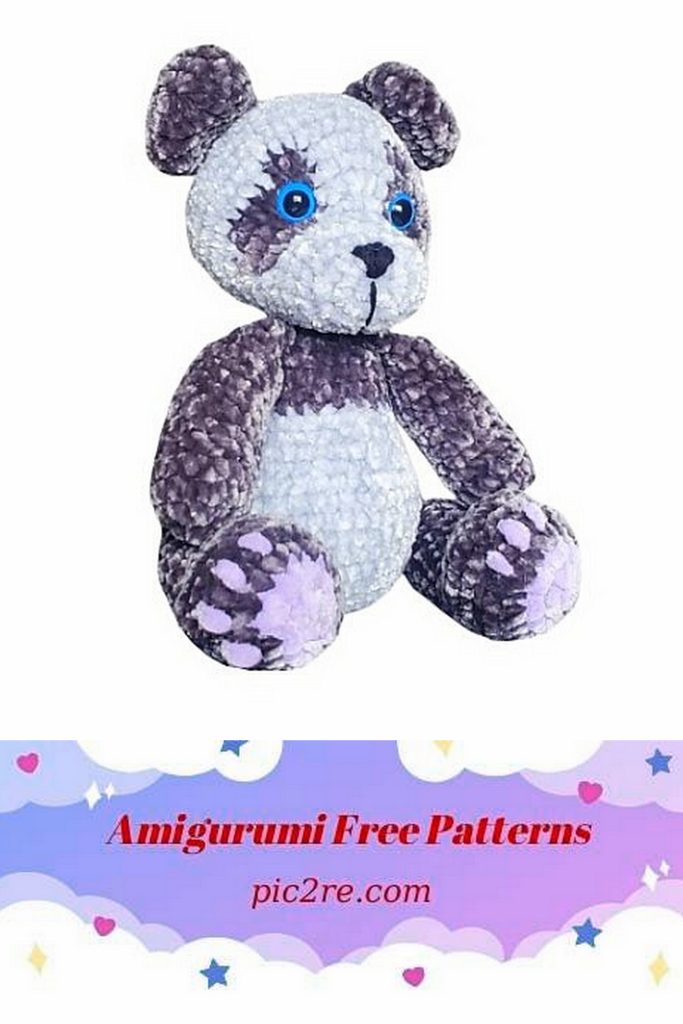
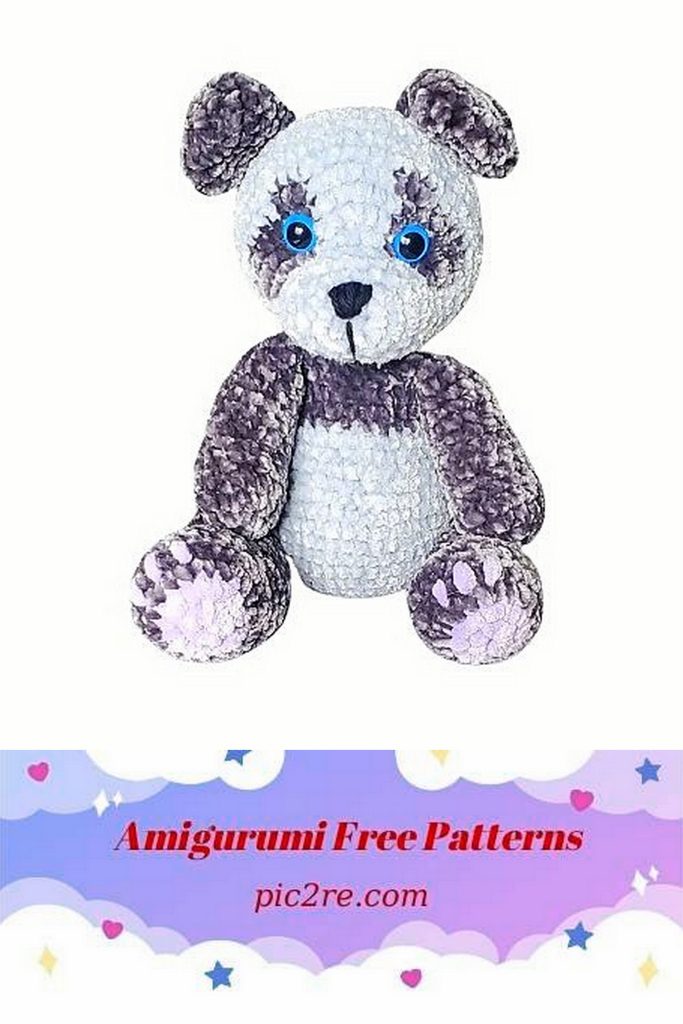
Free Cute Crochet Panda Pattern
Are you ready to embark on a crochet adventure filled with adorable charm? Look no further than this delightful free crochet panda pattern! Whether you’re an experienced crocheter or just starting out, this project promises hours of enjoyment and a finished creation that will bring smiles to all who see it. With its irresistible charm and cuddly appeal, this crochet panda is perfect for gifting to loved ones or adding a whimsical touch to your own space.
Materials
-Hook: 4 mm
-Yarn: Main body color
– ‘Himalaya dolphin baby’ (white) Secondary color
– ‘Himalaya dolphin baby’ (black, pink) Brown for the hat
-16 mm safety eyes -15/22 mm safety nose
-Joints (30 mm) [optional]
-Yarn needle
-Scissors
-Hollowfiber
-St. marker
Abbreviations
MR – magic Ring ch – chain
sl st – slip stitch
sc – single crochet dec – decrease
inc – increase (2 sc in one st)
BLO – back loop only
cc-color change
(…)-repeat the instructions in parentheses
X… – repeat the instructions the number of times shown
FO – fasten off
*DO NOT LEAVE ANY THREAD FOR SEWING ON PARTS WHERE IT IS NOT SPECIFIED. ONLY THE HEAD AND TAIL ARE SEWN ON. THE OTHER PARTS WILL BE ATTACHED AS YOU CROCHET.
EARS (x2)
Start with the black
R1: 8 sc in a MR
R2: 8 inc (16)
R3:3 sc, inc, 7 sc, inc, 4 sc (18)
R4: 18 sc around
R5: 4 sc, dec, 6 sc, dec, 4 sc (16)
R6: 2 sc, 2 dec, 4 sc, 2 dec, 2 sc (12) 2 sc, fold in half and crochet 6 sc through both sides
cut the yarn, don’t stuff

Tail
Start with the black
R1: 6 sc in a MR
R2: 6 inc (12) R3: 12 sc
R4: (sc, dec)*4 (8)
stuff lightly
cut the yarn, FO leaving a tail for sewing place the tail between R7 &R9
ARMS (x2)
Start with the black
Stuff the arms as you go (R1-12)
R1: 6 sc in a MR
R2: 6 inc (12)
R3:4 sc, 3 inc, 5 sc (15)
R4: 15 sc around
R5: 5 sc, 3 dec, 4 sc (12) R6: 12 sc around
R7: 5 sc, inc, 6 sc (13)
R8-R13: 13 sc around (6 rows) R14: 5 sc, dec, 6 sc (12)
R15: 12 sc around 2 sc, fold in half and crochet 6 sc through both sides
cut the yarn.

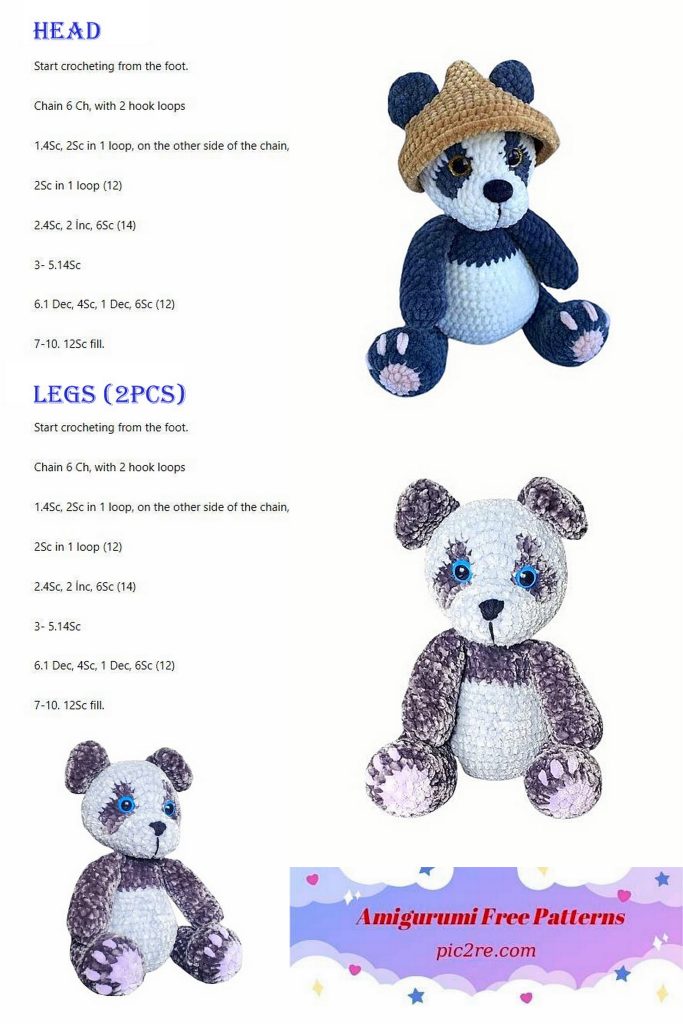
LEGS (x2)
*I have two options for crocheting the legs. In the PDF pattern I have made a version without using joints. My video tutorial will include instructions on how to crochet legs with joints.
Start with the pink
Stuff the legs as you go (R1-15)
R1: 8 sc in a MR
R2: 8 inc (16) (cc to black)
R3: (sc, inc)*8 (24)
R4: (3 sc, inc)*6 (30)
R5: 30 sc (BLO)
R6: 30 sc around
R7: 9 sc, 6 dec, 9 sc (24)
R8: 6 sc, 6 dec, 6 sc (18)
R9: 7 sc, 2 dec, 7 sc (16)
R10-R12: 16 sc around (3 rows)
R13: dec, 14 sc (15)
R14-R16: 15 sc around (3 rows)
R17: (sc, dec)*5 (10)
2 sc, fold in half (make sure feet are facing forward, not to the side. Adjust stitches if necessary) and crochet 5 sc through both sides
cut the yarn,
BODY
Start with the main
R1: 6 sc in a MR
R2: 6 inc (12)
R3: (sc, inc)*6 (18)
R4: (2 sc, inc)*6 (24)
R5: (3 sc, inc)*6 (30)
R6: (4 sc, inc)*6 (36)
R7: (5 sc, inc)*6 (42)
R8: (6 sc, inc)*2, 2 sc, inc, 6 sc, inc, 3sc, inc, 6 sc, inc, 7 sc (48)
BODY
R9: (version without using joints) 9 sc, 5 sc tog with leg, 18 sc, 5 sc tog with leg, 11 sc (48) [Make sure the legs are facing forward and symmetrical to each other, adjust the stitch if necessary]
R9: (version with joints) 48 sc around R10-R12: 48 sc around (3 rows)
*Attach the legs with joints to the body after R12.
R13: (6 sc, dec)*6 (42)
R14: (5 sc, dec)*6 (36)
R15: 36 sc around
R16: (4 sc, dec)*6 (30)
R17: 30 sc around [cc to black]
R18: (3 sc, dec)*6 (24)
R19-R20: 24 sc around (2 rows)
R21: (2 sc, dec)*6 (18)
R22: 2 sc, 6 sc tog with arm, 3 sc, 6 sc tog with arm, sc (18) [cc to white]
(Adjust if necessary)
R23: dec, 7 sc, dec, 7 sc (16)
cut the yarn, FO, leaving a tail for sewing
HEAD
Start with the main
R1: 6 sc in a MR
R2: 6 inc (12)
R3: 2 sc, (3 sc in one st)*2, 4 sc, (3 sc in one st)*2, 2 sc (20)
R4: 5 sc, inc, 8 sc, inc, 5 sc (22)
R5-R6: 22 sc around (2 rows)
[HOW TO CROCHET R7-R10 IS SHOWN IN THE VIDEO TUTORIAL]
In rounds 7-10 you will be color changing. The black text – white yarn, the red text – black yarn. (watch video tutorial)
R7: 6 sc, 3 inc, 3 inc, 3 inc, 7 sc (31)
R8: 6 sc, inc, 3 sc, inc, 2 sc, sc, inc, 2 sc, 2 sc, inc, 3 sc, inc, 7 sc (36)
R9: 7 sc, inc, sc, 3 sc, inc, 2 sc, 2sc, inc, 2 sc, 2 sc, inc, 3 sc, sc, inc, 8 sc (41)
R10: 9 sc, inc, 5 sc, inc, sc, 3 sc, inc, 2 sc, sc, inc, 6 sc, inc, 9 sc (46)
R11: 13 sc, inc, 19 sc, inc, 12 sc (48)
*Place the eyes between rows 8 and 9, about 7 visible sts apart
*Place the nose between rows 3 and 4
R12-R14: 48 sc around (3 rows)
R15: (6 sc, dec)*6 (42)
In R16, we’re going to add on the ears.
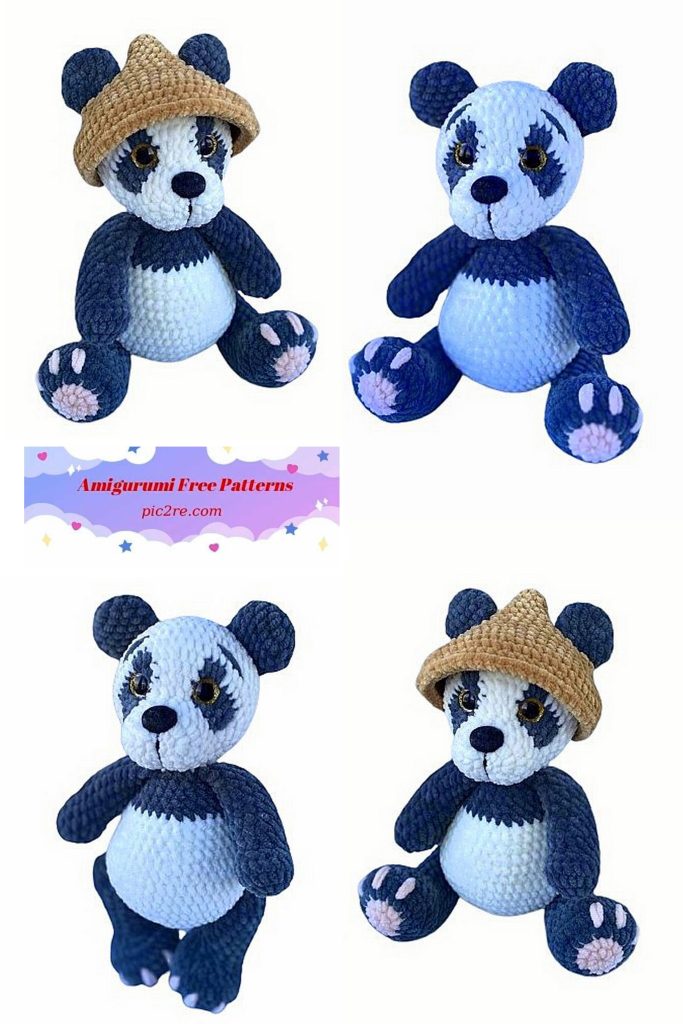
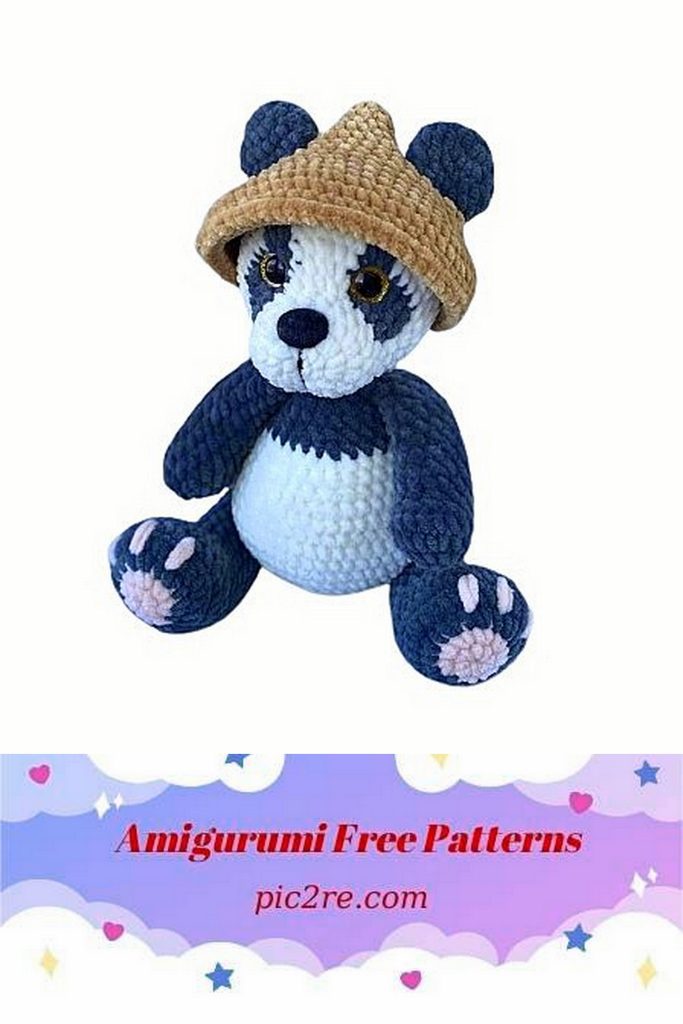
Adjust stitch if necessary. Refer to the photo when adding the ears. (see pic)
R16: 12 sc, 6 sc tog with ear, 7 sc, 6 sc tog with ear, 11 sc (42)
R17: (5 sc, dec)*6 (36)
R18: (4 sc, dec)*6 (30) *start stuffing
R19: (3 sc, dec)*6 (24)
R20: (2 sc, dec)*6 (18)
R21: (sc, dec)*6 (12)
R22: 6 dec
HEAD
!NEXT WE’LL EMBROIDER THE FACE. I
Cut the yarn, close the hole, sew the head to the body.


HAT
R1: 5 sc in a MR
R2: 5 inc (10)
R3: 10 sc around
R4: (sc, inc)*5 (15)
R5: (2 sc, inc)*5 (20)
R6: (3 sc, inc)*5 (25)
R7: 3 sc, ch 9, 6 st skip, 8 sc, ch 9, 6 st skip, 3 sc (32) Try the hat on head and adjust stitch if necessary [see pics]
R8: 3 sc, 9 sc on the chain, 8 sc, 9 sc on the chain, 3 sc (32)
R9: (6 sc, inc)*3, 5 sc, inc, 5 sc (36)
R10: (5 sc, inc)*6 (42)
R11: (6 sc, inc)*6 (48)
R12: (7 sc, inc)*6 (54)
R13: (8sc, inc)*6 (60)
R14-R15: 60 sc around (2 rows)
R16: 60 sl st

Cut the yarn. Your panda is ready..